Written by: Alex Darc
I love garlic and use quite a bit of it in my cooking. So I plant a lot of garlic. I also love that here in my Northeast garden, I can plant garlic in the Fall and forget about it until mid-late spring, and then just water and keep it weed free. And because Garlic grows best in well-drained, moisture-retentive soil with pH between 6.0 and 7.0, it is perfect for growing in Mel’s Mix!
 When picking a garlic to grow in your Square Foot Garden, you want to consider what you want from a garlic crop. Do you need it to store a long time at room temp? Do you want it hot and spicy like Rocambole or mild Elephant garlic? Do you need it to withstand extreme winter cold? Hardneck varieties might be your best bet. Or maybe you have heat and drought? Rocambole like it dry and hot. Are you hoping to braid it? You’ll need a softneck variety for that. All these things should be considered in order for you to have a successful garlic crop. A good growers catalog or website will have all these details listed so you can choose a garlic well suited to your needs.
I try to buy my garlic as locally as possible, that way it is more likely to be better adapted to my climate. I generally source from a seller who knows exactly what variety they are selling and what the pros and cons are of that variety. Sometimes I buy online, sometimes in person at a farmer’s market or seed sale/swap. I typically avoid planting grocery store garlic because it is often imported or grown in parts of the country far from my New England Square Foot Garden, and it isn’t suited to the climate. I also have no way of knowing the variety, the length of time it should store or if it is free of soil borne disease. Another benefit of buying USDA certified seed garlic is that it has to be tested as free of disease that can infect your bed, garlic bulbs sold as food do not get tested, and may or may not be free of disease.
When to plant garlic depends on your location and climate. Here in the Northeast, we plant garlic in the mid-late fall. I usually do it right after I’ve cleaned my summer crops out of the beds and added more compost to refresh the bed, from about mid-October until mid-November. In warmer climates, should be planted in early spring February- March. If you aren’t sure when you should be planting garlic, check with your local Agricultural Extension Office to find out the best time for your area.
Now for the HOW TO:
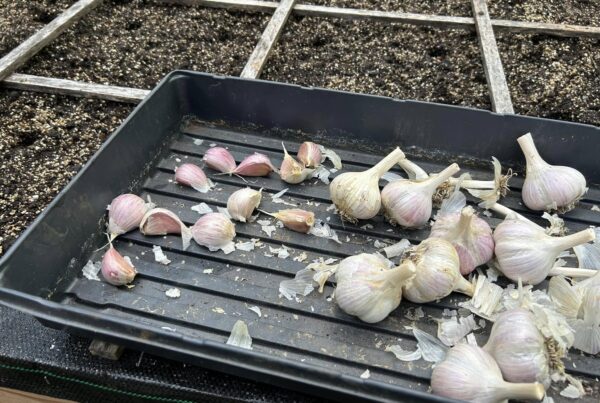
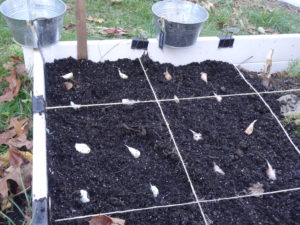
In Square Foot Gardening planting garlic couldn’t be easier. All you have to do is separate your garlic bulbs into cloves and plant 4-9 cloves per square foot. Check your instructions from the seller. If it says plant 6 inches apart in a row, you want to plant 4 to a square and if it says plant 3-4” apart, you want to plant it 9 to a square.
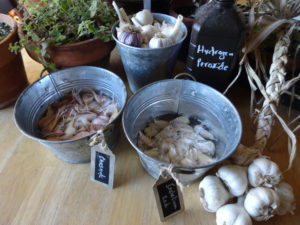
You can either plant them dry, or you can soak them in isopropyl alcohol, hydrogen peroxide or vodka to sterilize them, and help prevent spreading mites and diseases. To soak them add your chosen sterilizer to a small bucket and then add your garlic cloves, and soak for ten minutes. Then strain them. If you have multiple varieties or batches to do, strain the liquid into another bucket (this year those sterilizers are hard to come by, and should be reused for all your batches rather than discarded).
Some gardeners also choose to follow the sterilizer soak with a fertilizing soak to boost the nutrients going to this heavy feeding crop. To do this put cloves in a bucket with a natural fertilizer like fish emulsion, or seaweed fertilizer (use the application rates according to the package of fertilizer) and then add one teaspoon of baking soda per gallon of liquid. Soak the cloves for 30 minutes to 24 hours, and then plant. If you are soaking more than one variety, label your buckets. One bucket of soaking cloves looks very much like another bucket of cloves.
Plant each clove about 3 inches deep with the pointy end pointing upwards and cover them with 3-5 inches of LIGHT mulch. Straw, salt marsh hay, shredded leaves, or shredded newspaper are perfect for this. This mulch will keep them warm over winter and help block any weed growth come spring. If you are planting more than one variety make sure to clearly label your plantings with a weather proof marker.
Now let those garlic bulbs sleep through winter, come spring they will be one of the first things popping up out your garden. When the ground begins to dry out, in late Spring/Early Summer, don’t forget to start watering your garlic regularly. It can be easy to forget a crop that has taken care of itself for so long. Because it spends such a long time growing (in my garden it spends almost 9 months in the ground) garlic is one of the crops in Square Foot Gardening that may need a boost of compost top dressing every month or so in spring/summer.
Watch for garlic scapes on hardneck varieties. These are the corkscrew like flower heads coming from the top of the plant. When they emerge, cut or pinch them off to drive the plant’s energy to the bulb rather than the flower. Save these scapes for cooking with, they are a delicacy! About a month after the scapes appear, the lower leaves will start to die back. This is normal. Do not over water your plant at this point, because you can rot your garlic. When half the leaves have died, you can harvest your garlic!
Come on back in about 8 months for more info on how to harvest, and cure garlic for storage.